Traffic Light Controller
In this lab you will implement a traffic light controller that controls a main street, a side street and walk lamps. You will be using a finite state machine to implement this controller. This lab provides you with a design methodology that will be useful in future labs and final projects. This involves planning your design, coding, wiring, and debugging your design.
Procedure
There are two major phases. The first is the design phase, which consists of reading through the lab, planning, and coming up with a design. Although not required, it is suggested that you schedule a conference with a member of the course staff to review your design. This will help catch any major mistakes early in the process.
The next phase is to implement the first part of the lab using the FPGA. After you verify the traffic light controller's functionality, you can get checked off. Be ready to demonstrate the lab and to present solutions for the problems asked in the checklist.
You will be required to write a detailed report (see guidelines for lab 3 report at the end).
Traffic Light Controller Description
The traffic light controller is for an intersection between a Main Street and a Side Street. Both streets have a red, yellow, and green signal light. Pedestrians have the option of pressing a walk button to turn all the traffic lights red and cause a single walk light to illuminate. Lastly, there is a sensor on the Side Street which tells the controller if there are cars still on the Side Street. This is summarized in Figure 1.
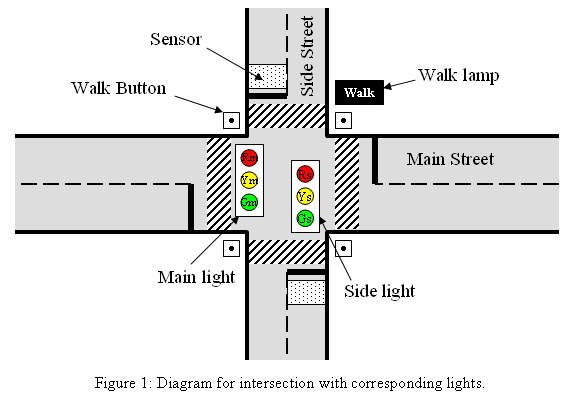
You may assume that the 4 walk buttons placed at each street corner are hooked into the traffic light controller using a wired-OR. For this reason, you may assume that the controller only needs a single input called Walk-Request.
The side street sensor is placed near the intersection to tell the controller when there are cars passing over the sensor. You may assume the sensor remains constantly high if several cars pass over the sensor, rather than quick pulses, provided the cars are close enough together. You do not need to implement this specific functionality. This input is named Sensor.
The traffic lights are timed on three parameters (in seconds): the base interval (tBASE), the extended interval (tEXT), and the yellow light interval (tYEL). The default values listed in the table below are to be loaded into the FPGA on reset, and may be reprogrammed on demand using switches and buttons on your kit with the Time_Parameter_Selector, Time_Value, and Reprogram signals. Time_Parameter_Selector uses the Parameter Number code to select the interval during programming. Time_Value is a 4-bit value representing the value to be programmed; therefore, it has a duration of seconds between 0 and 15. The Reprogram button tells the system to set the currently selected interval to Time_Value.
| Interval Name | Symbol | Parameter Number | Default Time (sec) | Time Value |
|---|---|---|---|---|
| Base Interval | tBASE | 00 | 6 | 0110 |
| Extended Interval | tEXT | 01 | 3 | 0011 |
| Yellow Interval | tYEL | 10 | 2 | 0010 |
The operating sequence of this intersection begins with the Main Street having a green light for 2 lengths of tBASE seconds. Next, the Main lights turn to yellow for tYEL and then turn red while simultaneously turning on the Side Street green light. The Side Street is green for tBASE, and its yellow is held for tYEL. Whenever a stoplight is green or yellow, the other street's stoplight is red. Under normal circumstances, this cycle repeats continuously.
There are two ways the controller can deviate from the typical loop. First, a walk button allows pedestrians to submit a walk request. The internal Walk Register should be set on a button press and the controller should service the request after the Main Street yellow light by turning all street lights to red and the walk light to on. After a walk of tEXT seconds, the traffic lights should return to their usual routine by turning the Side Street green. The Walk Register should be cleared at the end of a walk cycle.
The second deviation is the traffic sensor. If the traffic sensor is high at the end of the first tBASE length of the Main street green, the light should remain green only for an additional tEXT seconds, rather than the full tBASE. Additionally, if the traffic sensor is high during the end of the Side Street green, it should remain green for an additional tEXT seconds.
Block Descriptions/Implementation
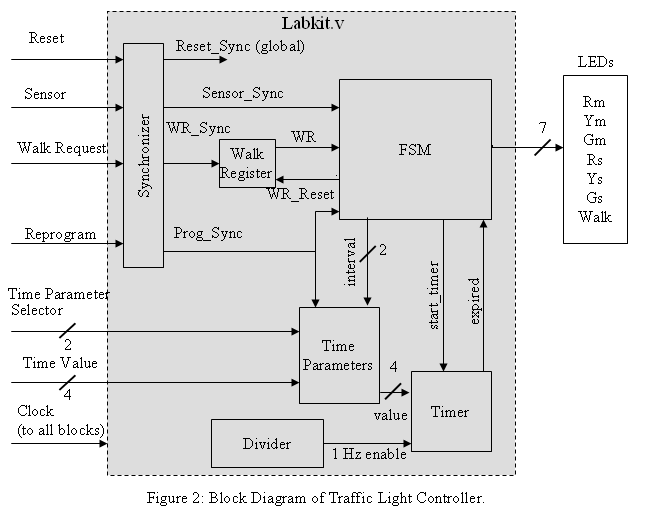
You should implement this lab by programming each block individually and then instantiating and connect the Verilog modules together in the toplevel Labkit.v module. Then compile your implementation using the Xilinx tools, download it to your kit's FPGA, and demonstrate its operation by using the kit's LEDs. Use your kit's push buttons for the walk request, sensor input and reprogram signals. Use six of the toggle switches to select the time interval and value to be used during reprogramming. Please read the section on "Synchronization and debouncing" to understand how to correctly incorporate the buttons and switches into your design.
- Synchronizer
- On the block diagram, you see that all input signals pass through the synchronizer before going to other blocks. The purpose of the synchronizer is to ensure that the inputs are synchronized to the system clock.
- Walk Register
- The Walk Register allows pedestrians to set a walk request at any time. There is also a signal controlled by the finite state machine that will be able to reset the register at the end of the actual walk cycle.
- Time Parameters
-
The time parameters module stores the three different time parameter
values, namely tBASE, tEXT, and tYEL
on the FPGA. The module acts like a (small) memory from the FSM and
Timer blocks, where the FSM addresses the three parameters and the
timer reads the data. From the user's perspective, the three time
parameter values can be modified.
On a reset, the three parameters should be respectively set to 6, 3, and 2 seconds. However, at any time, the user may modify any of the values by manipulating Time_Parameter_Selector, Time_Value, and Reprogram. Each of these values are 4 bits, and is selected using a 2 bit address. Whenever a parameter is reprogrammed, the FSM should be reset to its starting state. - Divider
- The divider is necessary for the timer to properly time the number of seconds for any particular traffic light state. Using only the clock as input, this module generates a 1 Hz enable, which is sent to the timer. The signal generated is a pulse that is high for one clock cycle every 1sec.
- Timer
- The timer is responsible for taking the start_timer, 1Hz enable, and Time Parameter value to properly time the traffic light controller. When done counting a particular state, the expired signal will go high for one clock period to signal to the FSM that it should change states.
- Finite State Machine
- The finite state machine controls the sequencing for the traffic light. As previously described, it changes states based on the Walk Register and sensor signals, and with the expired signal.
Labkit.v
The labkit.v template top-level file can be downloaded by right-clicking on the link and choosing "Save As". Labkit.v allows a user to utilize all of the labkit features including buttons, switches, leds, logic analyzer pins, user input/output pins, audio video capabilities, etc. We suggest that you work through the software tutorials "Getting Started with ISE" and "Programming the Labkit", which guide you through how to create a simple counter using the labkit LEDs and how to program it onto the FPGA. After working through the tutorials you will be ready to program your traffic light controller onto the labkit FPGA.
You will need to instantiate all submodules in this top level file as well as create wires to connect the submodules. For example, to connect and instantiate your divider and timer blocks you could add something similar to the following lines in the labkit.v file:
//declare wires as shown in Figure 2 to connect the submodules:
wire reset_sync;
wire one_hz_enable;
wire [3:0] value;
wire expired, start_timer;

//instantiate the submodules and wire their inputs and outputs
//(use the labkit's clock_27mhz as the clock to all blocks)
divider divider1 (clock_27mhz, reset_sync, one_hz_enable);
timer timer1(clock_27mhz, reset_sync, value, expired, start_timer);
In addition, you will need to wire the input buttons and switches that you use to the appropriate submodules. Currently the labkit's eight output LEDs: output [7:0] led; are all defaulted to their off state. If you choose to use them as your traffic lights, then you need to control the led signals with your own logic (a "0" will turn the kit's leds ON, a "1" will turn them off).
Synchronization and debouncing
Your clocked state machine is controlled by several asynchronous inputs that might be changed by the user at any time, potentially creating a problem with metastability in the state registers if one of the inputs changes too near a rising clock edge. In general asynchronous inputs need to be synchronized to the internal clock before they can be used by the internal logic. synchronize.v (available on the Handouts page of the course website) is a Verilog implementation of a pulse synchronizer that can convert an asynchronous signal to a synchronous one with acceptably low probability of metastability in the synchronous signal. You should feed all asynchronous inputs through an instance of the synchronize module and use the output signal in the design of your system.
A second problem arises from the mechanical "bounce" inherent in switches: as a metal contact opens and closes it may bounce a couple of times, creating a sequence of on/off transitions in rapid succession. So you need to use debouncing circuitry to filter out these unwanted transitions. debounce.v (available on the Handouts page of the course website) is a Verilog implementation of a digital retriggerable one-shot that requires that an input transition be stable for 0.01sec before reporting a transition on its output. This module happens to produce a synchronous output, so a separate synchronizer is not required. You should use an instance of the debounce module to debounce any switch inputs you use in your design.
Guidelines for Lab 3 Report
6.111 will count as a Communications Intensive Major (CI-M) subject. This document specifies our technical expectations for the formal write-up of your Traffic Light Controller and outlines the quality of writing we hope to see in your report. Laboratory 3 will eventually count for 16% of your final grade with 6% being assigned primarily on the technical merits of your lab work and the content of your lab report. This portion of your grade will be assigned by the 6.111 staff. The other 10% will be assigned by the writing department. The writing department will provide feedback on your writing for the first version of your report. You are required to make a revised version which will then be graded by the writing department. Your grade is based on the quality of writing found in your revised formal lab report. Please submit your report on-line (see the "Submit PDFs" link at the course website). Your report will be evaluated by both the course staff and folks from the Writing Across the Curriculum program.
When your report draft is complete, please upload it to the course website for review using the "Submit PDF" webpage at the course website.
Your report should contain a cover page with a title, your name, the course name, and the date. Your cover page should also contain a abstract of several sentences that summarizes the content of your report.
- Table of Contents/Figures
- You should have a Table of Contents and a List of Figures for your lab report.
- Traffic Light Controller Overview
- The introduction should present a summary of your traffic light controller's functionality and how you went about implementing this project. We would like for you to describe how a user interfaces with your traffic light controller through I/O ports such as push buttons, switches, and LEDs. Be sure to present a table of timing parameters. Feel free to use Figure 1 (modified to fit your approach) from the lab handout for this part.
- Traffic Light Controller Module Description/Implementation
-
Describe the various modules in your design. You should tell us what
each piece of the system does and explain how these various pieces
work together. Be sure to discuss the synchronizer, Walk Register,
FSM, parameter memory, and divider modules. This section should make
up the majority of your paper. We expect a thorough explanation of the
various aspects of your design. For modules with state elements,
describe your clocking strategy.
When explaining your FSM make sure to present a detailed discussion of this module complete with a description of its inputs and outputs. You description should mention the various FSM states in your design and what happens in each of these state. A state transition diagram of your FSM is required. Additionally, we ask that you submit screen captures from your simulations for your synchronizer, Walk Register, and FSM.
- Testing and Debugging
- In this section we would like you to talk about your experiences testing and debugging the traffic light controller. We would like for you to discuss how you tested your digital system and mention ways in which this could have been done better. Mention problems that weren't detected during simulation and that only were discovered in testing the actual implementation. Provide us with a description of the design flow you used in the creation of your traffic light controller by discussing the Xilinx tool chain, the simulations you performed, and wiring up the FPGA. Be sure to include specific details in this section.
- Conclusion
- In closing your paper we ask that you write about the objectives of this lab and in what ways you believe you have achieved them. We are particularly interested in hearing about what you think are the important concepts to take away from the design of this digital system. Don't forget to mention where you might have done something differently if asked to implement this project again.
- Appendix
- For the technical submission of your lab report we ask that you include printouts of your Verilog code in the Appendix. This portion is not required for your submission to the writing department.
Writing Considerations
While the 6.111 staff will be grading your lab report for technical content, we will also be taking the quality of your writing into consideration when assigning grades. We ask that all figures and tables be created using a computer (i.e. no handwritten submissions). Since 10% of your grade in 6.111 is based on the writing quality found in your formal report we expect you to dedicate a significant amount of your time in writing this report to polishing and editing. On the course webpage we have made available to you a number of writing resources that we hope you will find useful. If you have any questions or concerns relating to your formal write-up please contact the 6.111 staff and we will do our best to help you.